Postingan

Menampilkan postingan dengan label Android Tips

How To Find Perfect Google Camera Mod For Your Android Phone

Gambar
Many of you are trying to find best Google Camera mod for your phone but can't find it.So that's why I am gonna share a easy trick to find. The magic app name is- GCamator Gcamator will help you to install the most compatible version of Camera, for your device Application has remote database, where stored Camera applications for almost 300 device at this moment. * Application will detect Camera2Api status automatically and will inform you about that * On the second tab, application will recognize your device data and gives you relevant version of Camera for your device * If application can't find Camera for your smartphone, you could " Subscribe Notification ". After that, your smartphone data, like Device Manufacturer, Model and Android Version will be sent to developer and then it will be added about a few hours. You will get notification on your smartphone about it * You could try to go to third tab and download relevant version manually * Some devices, like Xi...

Best Android Launcher That Give Your Phone Best Look In 2020

Gambar
What is an Android launcher? Android smartphones are inoperable without a launcher, which comprises your home screen and the catalog of all the apps available on your device. That’s why every device comes with a default launcher pre-installed. For instance, a Google Pixel device comes pre-installed with the Pixel Launcher. Why use third party launchers? The answer to this question is pretty simple: Third-party launchers offer screen customization for users to suit their needs. To save you from the trouble of browsing through hundreds of launchers on the Play Store, here is a list of the best launchers for Android. The apps are described in detail along with their download links further down the article. Best Android Launchers For 2020- Nova Launcher Evie Launcher Launcher iOS 13 Apex Launcher Niagra Launcher Smart Launcher 5 Microsoft Launcher ADW Launcher 2 Google Now Launcher Lawnchair Launcher BaldPhone 1. Nova Launcher Nova Launcher is truly one of the best Android launchers around...

How To Enable Camera2 API On Android

Gambar
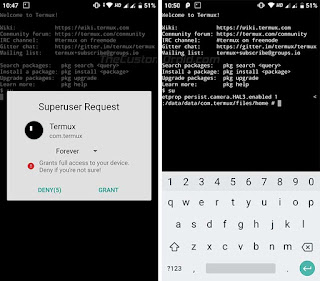
In order to install Google Camera Port, you must first enable Camera2 API on your Android phone. It’s easy to enable it when your phone is rooted, by editing the build.prop file manually, or by simply issuing some simple commands. Note: Must be rooted phone. Download and install Termux (Terminal Emulator) on your phone Once installed, launch Termux and enter the following command: su Grant superuser permissions to Termux when prompted Finally, enable Camera2 API on your Android phone by entering the following command: setprop persist.camera.HAL3.enabled 1 setprop persist.vendor.camera.HAL3.enabled 1 setprop persist.camera.stats.test 5 setprop persist.vendor.camera.stats.test 5 Once the commands have executed successfully, reboot your phone.

Some Useful Google Camera Tips

Gambar
At first glance, Google’s Camera app looks surprisingly simple—nothing but a viewfinder and a shutter release. Once you start tapping and swiping, though, you’ll find a bevy of hidden options, ranging from a self-timer and exposure settings to a panorama mode and even the ability to create a Street View-like “photo sphere.” Snap photos with the volume buttons Go ahead and press a volume button—and when you do, you’ll start snapping. Take a selfie Look closely, though, and you’ll see a small, three-dot “overflow” button in the corner of the viewfinder (either the top or bottom corner, depending on how you’re holding your Android device.) Tap it, and a series of new buttons will slide into view, including one that looks like a phone with a lens and a little arrow. Tap that button to toggle between your device’s rear and front-facing lenses. Set the self timer Just tap the three-dot overflow button, tap the button that looks like an alarm clock with a slash through it, then pick a timer s...

Alternative Ways To Unlock Your Android Phone

Gambar
There has to be an easier way for your Android phone to know it’s you besides a passcode, a PIN, or a pattern lock, right? A fingerprint reader is a good start, but they still have a way of failing even when you swipe your fingertip perfectly on the sensor, thus returning you to the need to enter a PIN or swipe pattern to unlock your own device. Keep your phone unlocked while it’s in your pocket Here’s how you do it: Tap Settings > Security > Smart Lock, confirm your screen lock, tap On-body detection, then flip the On switch. Keep your phone unlocked at home, at work, or near another specific place Tap Settings > Security > Smart Lock > Trusted places, then tap Add location. You can then pick a place—like, say, your home—by swiping on the map with your finger, or tap the Search button to search for an address. Keep your phone unlocked near a ‘trusted’ device To set up a trusted device, tap Settings > Smart Lock > Trusted devices, then tap Add trusted device. Unloc...

How To Unlock Bootloader On Xiaomi Devices

Gambar
Try to follow all the steps with sincerity since one step in the wrong direction is enough for Xiaomi to reset the waiting period. Step 1 – Make a Xiaomi account and sync your mobile number Xiaomi users generally skip making an Mi account during the initial setup. But in order to unlock the Mi device bootloader, it is necessary to have a working account on the device. Moreover, it is important to link the number on the device with the Xiaomi account. Also, refrain from connecting unowned numbers to the Xiaomi account on the device in order to avoid obstacles in the process. After failing to unlock the bootloader a few times, I realized that Xiaomi requires “Find My Device” toggled and synced to the latest location for some reason. You will find the settings under Mi Account > Mi Cloud > Find Device. In order to update the location, sign in at the Xiaomi cloud website on a computer, click on “Find Device” and choose your current device. Step 2 – Authorize Mi Unlock in the develop...

How To Enable Android Developer Options, USB Debugging, OEM Unlock

Gambar
Go to Android settings Tap on System-About phone Scroll down and look for Build Number Tap on Build Number option five to seven times. You will see a pop-up each time you press on it, “You are [X] number of times away from being a developer” Once you have tapped enough times, you will see a message, “You’re now a developer” Go back to main Android settings Scroll down, then tap on the System option Tap on Advanced. You will now see the developer options Once you are under Developer settings, there are a bunch of things you can do. Of course, there is USB debugging and OEM unlocking, but there are several interesting options that I’ve talked about at the end of this article. USB Debugging Here is how to enable USB debugging in Android Developer options. Enable the developer settings in Android Scroll down to the “Debugging” section Enable USB Debugging Allow USB Debugging by tapping on “OK” OEM Unlock Here is how to enable OEM Unlock in the Android developer settings – Enable the develo...